How to use this Documentation?
This documentation covers all the help which you must read carefully before operating data recovery software. The Knowledgebase provides full information regarding the software functionality and its working with added advantage of snapshots which help in step by step data recovery.
We suggest you to read the documentation carefully for better understanding of software capabilities and features.
It contains the following section :
Why Pro Data Doctor?
When your important business data is lost, you will take all possible steps to retrieve the data back. So what are you looking when searching for data recovery firm? You need a company that can be trusted and has the answer to recover data successfully.
Pro data doctor welcomes you all in the world of data recovery. This section explains how software works, its unique features and compatibility towards the system etc. Pro data doctor is the global firm providing data recovery software, for windows file system recovering all yours lost and damaged data from the most infected hard drives.
We are leading authority in data recovery software solutions and data recovery services for Microsoft Windows operating systems. The Pro Data Doctor Pvt. Ltd provides recovery and restoration of corrupted hard disk drives. Also helps home users and companies preserve their data and computing environments.
Our Software is used by most of the top companies and corporate world. We have experienced data recovery specialist, developers, consultants as part of our competent team. We work according to customer needs and requirement, which is the key to our success.
We stands firm providing fast, efficient and affordable software solutions that set new standard in the world market.
What is Data Recovery?
When a computer start loosing its data, panic is created among users and can react by making small problem a worse case. People don’t know what to do when they face data loss and how to recover it back. How you handle your data recovery process will determine whether information is saved or permanently lost.
We have reached an age where computers have become the main source for leisure, educational and work purposes. We can not survive without computers and it has become a necessity in our life. People rely heavily on computer for there day to day activities such as school-offices, chatting, shopping, surfing, data gathering, games, keeping records etc.
Nobody likes their computer to get corrupted or damaged. When a computer breakdown happens in the home it is disastrous, but when it occurs in IT or software companies they can suffer heavy losses both in terms of time and money.
Pro data doctor’s Windows data recovery plays an important role in the data recovery from the FAT-NTFS file system. Data recovery software is used for data recovery to retrieve all lost and damaged data from corrupted and formatted hard drives.
For best results choose, most RAM-loaded computer and attach the drive as secondary from where you want to recover to this machine.
Software Overview :
This section explains the software pre-installment guidelines that you have to follow before the data recovery. If the Demo software is already installed on your computer, it is strongly recommended that you should uninstall it before installing the licensed version.
How to Save Recovered Data?
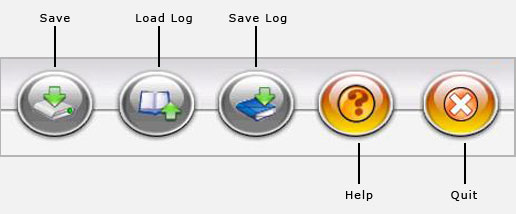
Software Toolbar
Tool bar button and their description

Saving Decovered Data
- From the tool bar
- From the left side panel
- From the right side panel
- Saving selected data
From the Tool Bar
Perform the following routine to save data from the tool bar
- Click on the save button
- Select the location to save the files shown in the tree view
- Saved the recovered files to the specified location

From the Tool Bar
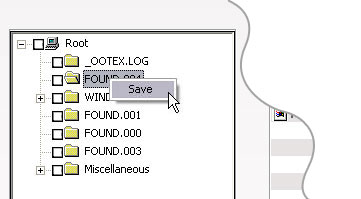
From the Left Side Panel
Perform the following routine to save data from the left side panel
- Select the files on the left panel
- Right click the files or folders
- Saved the recovered files

From the Left Side Panel
From the Right Side Panel
Perform the following routine to save data from the right side panel
- Select the files on the right panel
- Right click on any file
- You will see popup menu with options :open, save, save all
- Perform the task according to your choice

From the Right Side Panel
Saving Selected Data
You can save the selected data files according to your choice. Just check the box of desired files to be saved from the left panel and use right click to save the selected files and folders to a specified location.

Saving Selected Data
Searching Partition
Before Scanning
- Select the physical disk from left panel from where you want to recover data.
- Select the logical partition from left panel from data is recovered.
- Select searching criteria (Standard / Advanced) and press next button to proceed.
- Press search more partition button to search other lost and deleted partition.
- Press next button to start recovery.
After Scanning
- Select files and folders from left panel directories tree or the right side panel.
- Click on save button in toolbar to save recovered files and folders.
Stop Searching
- You can stop searching the files and folders by clicking the stop search button however it is strongly recommended that you should allow the data recovery software to complete the searching process.
Log
What is Log
Log is scanned information of files and folders detected in the recovery process. It proves to be major feature of the data recovery software. We know that after the scanning process is completed the recovered data can be saved to the desired location.
If the disk is small the scanning process takes less time. But if the disk is larger in capacity it takes more time for scanning as well as data saving.
Here log can be very handy. After scanning process is completed and with due reasons you have to shut the recovery process their is option provided to save all scanned directories in log file so that when next time software is operated for the data recovery you need not do scanning again just load the log and can save the recovered data.
Advantage of log
- Helpful in large capacity hard drives.
- Useful when data recovery process is halted.
How to save log
After the scanning is completed there is an option to save the log.
- Click on the save log button and the dialog box appears
- On the dialog box select the desired location to save the log
- By default log is saved in dnf file extension

save log
How to load log
- Click on the load log button
- Select the location from the dialog box where you have saved the log
- Double click on the saved log file and within few seconds all the scanned file is loaded in the software which become active scan which is displayed on the left panel
- Recover and save the lost data.

load log
The function is very easy to use. Just remember where you have saved the log so that you don’t lose it when you load log
Questions and Answer
This section helps you to get replies for frequently asked questions (FAQ). The section covers general and technical problems experienced by the users
Also resolves all your queries for product and purchase delivery.
Help Desk :
This section gives full information regarding technical support staff, to purchase and register your Data Doctor – Windows Data Recovery Software.
Further you can chat online for any query or suggestion and visit Glossary for your technical knowledge enhancement.